Waking up and brewing your first cup of coffee each morning is a ritual and helps start your day off on the right foot.
There are many different ways to brew your coffee, and you have to find the right tools to help make each cup of coffee something to look forward to.
One often overlooked way to make coffee at home is with an AeroPress. An AeroPress delivers flavorful, clean coffee at home in less than three minutes, and you'll get the perfect cup of coffee each time.
What is an AeroPress?

An AeroPress is a small piston-style brewer that you place on top of your coffee cup. You use the top of the AeroPress to push the water through a thin paper filter and into your cup.
The thin paper filter gives your coffee a defined flavor because any oil and sediment in your ground coffee stays on top of the filter and doesn't make it into your cup.
Specialty coffee lovers enjoy the AeroPress because they can experiment with the device to create different flavors. People have even had success in making coffee concentrate taste very similar to espresso.
The AeroPress is small and lightweight, which makes it perfect for taking camping or traveling. You can easily fit your AeroPress in your suitcase and not have to rely on the complimentary coffee that hotels offer.
It's versatility, portability, and ability to bring out the flavor in your coffee grounds is what makes the AeroPress a favorite amongst coffee lovers.
One important thing to note is the AeroPress is intended to make a single cup of coffee at a time, so it isn't the best choice if you have multiple people in your household who are all in need of coffee at the same time.
How to Brew Coffee with an AeroPress

It is extremely easy to brew coffee with an AeroPress, and it only takes a couple of minutes from start to finish.
Step One:
The first step is to start boiling your water and weigh out your coffee grounds.
You need 15g to 18g of coffee (the more coffee the stronger it will be) and 7oz of boiling water.
Step Two:
Next it is time to insert the filter into the detachable plastic cap on your AeroPress.
Traditionally, a thin paper filter is used in an AeroPress, but you can use a reusable metal filter as well.
Using a metal filter will give you a bolder flavor and a paper filter provides a more subtle flavor. If you choose to use paper filters, you can reuse them two or three times before replacing them.
Step Three:
Now that the filter is in place, you need to wet the cap and filter. Pouring a little water on the cap helps the filter stick to the cap and heats your brewing vessel.
Be careful when pouring the water over the cap and filter. It is very hot, and you can easily burn yourself.
Grip the cap from the sides and very slowly pour the water over the filter to make sure it is being absorbed.
Step Four:
It is finally time to assemble your AeroPress. Make sure the AeroPress is dry, so you don't compromise the seal.
Step Five:
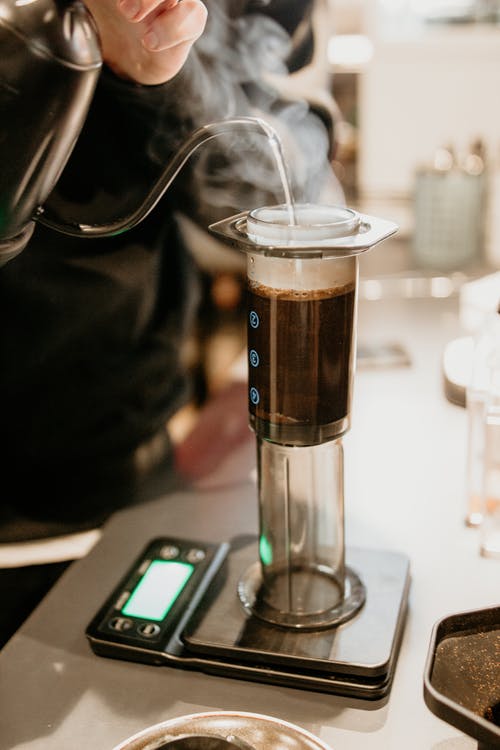
Place your AeroPress on your scale with the flared end up (the numbers on your AeroPress should be upside down) and recalibrate your scale, so it is reading 0.
Step Six:
It is now time to add your coffee grounds to the AeroPress using the circular opening of the AeroPress facing upwards on the scale.
Be sure you're careful when pouring your coffee grounds- you don't want to spill any of them!
Step Seven:
Once your coffee grounds are in the AeroPress, start a timer and add twice as much boiling water to the AeroPress as there is coffee.
For example, if you have 15g of coffee, add 30g of boiling water.
Step Eight:
Let your AeroPress sit for 30 seconds. Make sure all your coffee grounds are moist. If some aren't, gently tap the side of the AeroPress or use a paddle to gentle move the water to ensure all the grounds are evenly saturated.

Step Nine:
Fill the chamber with the remaining boiling water.
Step Ten:
Set your timer for one minute. Once a minute has passed, stir the grounds ten times to agitate them.
Step Eleven:
Fasten the cap with the filter onto the part of your AeroPress that is facing upwards on the scale. Make sure the cap is tightly locked into the grooves and isn't loose and leaking.
Next, flip the entire AeroPress over quickly but with control and place it on top of your cup.
Press down on the AeroPress. It shouldn't take too much effort to push down on your AeroPress.
If you have difficulties pushing your AeroPress down, your coffee grounds are most likely too fine. If it is too easy to push your AeroPress down, your coffee grounds are too coarse.
It may take some trial and error, but you'll find the perfect consistency for your coffee grounds. You may want to consult with your local coffee shop or coffee roaster if you need help finding the perfect coffee ground for your AeroPress.
As you're pushing down on your AeroPress, you'll start to hear a hissing sound. This means your coffee is brewed, and there is no more water to push through the filter.
Step Twelve:
Unscrew the cap of your AeroPress and place it aside. Once the cap is removed, you will see the filter at the bottom of your AeroPress. Remove it and push the condensed grounds out of your AeroPress and dispose of them as you see fit.
Looking for some new coffee to try in your AeroPress? Check out our selection!


